Do you want to track website conversions on your WordPress or WooCommerce website? With our simple step-by-step instructions you will achieve this. The easiest way to track WooCommerce website or online store conversions is by using CleverDrip pixels.
Start working with CleverDrip right away that can provide everything you need from managing partnerships to leads, clicks, sales, impressions and overall conversions tracking.
Step 1 :
Visit cleverdrip.com website & signup for free trial.
Step 2 :
Once you get confirmation mail & verify that, you will get platform access within a short while.
Sign In using your Username & Password. If incase you didn’t remember your password then use “Forgot Password?” option for Password Reset Instructions.
Step 3 :
Once you get dashboard view, Select Offers tab from Menu & after that click on “Add Offer” button.
Name your Offer for easy identification >> Choose “Offer Type” [CPL for User Registrations Tracking & CPS for Sales Tracking ] >> Enter offer preview url (In general it’s your website url or landing page)
Step 4 :
There are different options available for setting up your offer. All of them are optional. Make sure you enter valid payout value for the “Offer”. This is the amount where your website affiilates earn each time when they generate lead/sales using their affiliate tracking links.
After setting up your offer, The very next step is placing the pixel at your website Lead Capture Page or Sale Success Page or Thankyou Page to track conversions.
You can visit the “Pixels” page from the application top menu and choose based on your offer type.
Step 5 :
Download WooCommerce Conversion Tracking WordPress Plugin that helps you to place pixel on the success page. Get it now to easily pass conversions data to pixels.
Step 6 :
By default it takes preview page url to generate tracking links (Affiliate URL’s). If you still want to add multiple landing pages or product url’s you can add in the Links sections. You have also an option for uploading your content, banners or mailer creatives to promote your brand and drive traffic to your website.
There are different macros available too for advanced tracking purpose.
That’s it. You are good to go!
You can run your own offers using different platforms like google, facebook or email marketing by passing different subid’s for identification purpose and track the every detail in reports section. Or Invite affiliates to your program. Formerly called as Join in our Affiliate Program or Refer & Earn.
Step 7 :
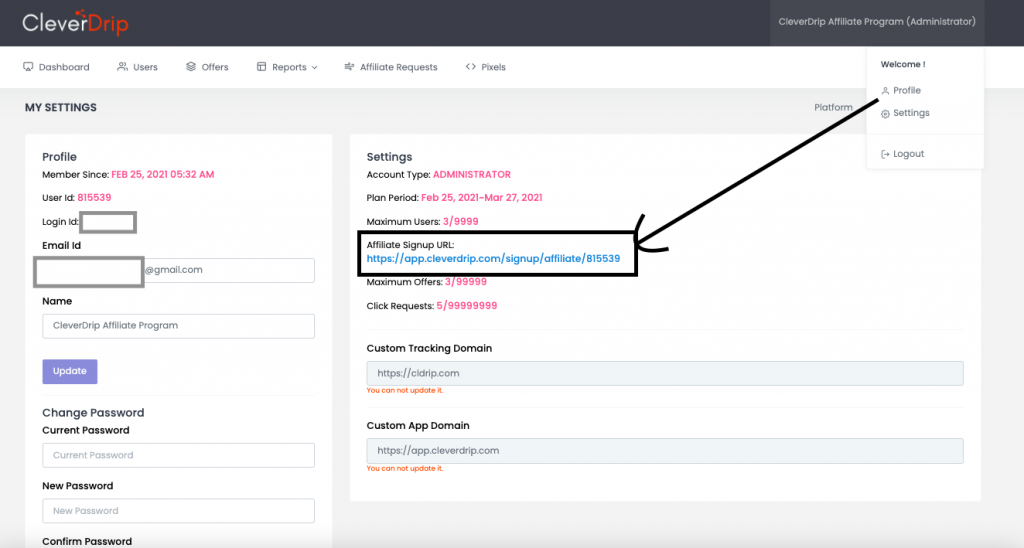
To invite affiliates or influencers you should redirect them to the URL which is available under your Affiliate Program Dashboard >> Profile Section. or else you need to manually add them under the “USERS” tab.

Once they signup for your affiliate program, as a Administrator of the program, you need to Approve user request or Block if you find they didn’t match your validation criteria. it’s upto you.
Once you approve user request, they can able to Login to their dashboard and promote your Live Offers. Every affiliate get their unique tracking url and reports section for realtime statistics. They don’t need to depend on you or wait for your reports for analytics. Every registred affiliate under your affiliate program gets their own dashboard and reports filters for advanced tracking.
As a Administrator, you can still view all your affiliate partners performance and optimize your advertising costs based on the conversion rate.
Start your free 30 day trial today
Start working with CleverDrip right away to understand and leverage how performance marketing can improve business growth.
